Happy Friday blogland friends. Today I have three cards to show you that I created using the new Spellbinders Layered Gladiolus die set from the Wildflowers Collection. As you know, I love floral dies and so when they offered to send me this one to create with, I could not say no! Each card colors the flowers using a different method.
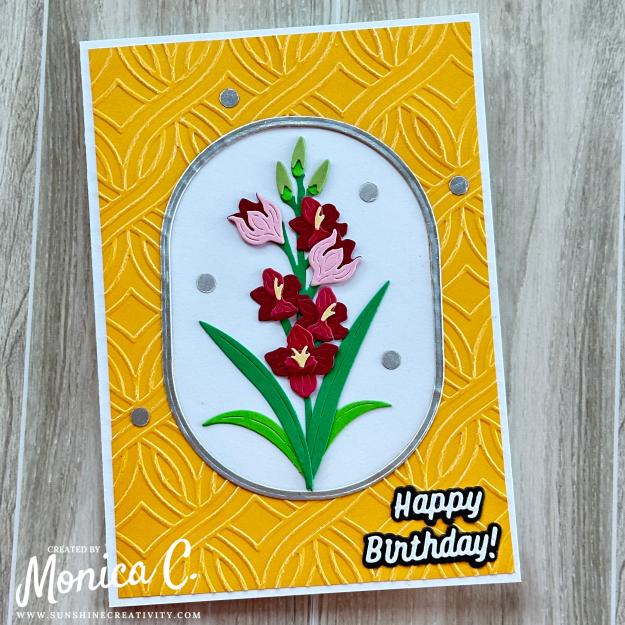
In my first card, I used just colored cardstock in various shades to create the gladiolus. Spellbinders does provide a layering guide on their website on the project page. I then created a cardpanel from yellow cardstock with a white core and cut a window out of the center using the Spellbinders Essential Stylish Ovals die set and then embossed the panel with a lattice embossing folder. Because the cardstock is white cored, the embossing caused a bit of the white to show through on the top of details.
I cut a silver frame using the same oval die and one size larger which I adhered to the window edge once I had added the panel to my 5×7 cardbase. The gladiolus was placed in the middle of the window, I added a sentiment from the Spellbinders Classic Sentiments die set and then added a few dots that I cut from the same silver metallic cardstock with a hole puncher.

My second card is created in the same manner other than that I used a purple cardpanel. Because of the darker color, the white of the core on the embossed detail is more visible. I colored the flowers and foliage with my Copic markers, added a gold frame and dots to the card and completed it with a “hugs” sentiment from the Spellbinders Everyday Sentiments die set.
I have my Mom to thank for the final card. She suggested making a card with the gladiolus in a vase. Looking through my stash, I realized that I did not have a vase die that would work, but I did have a “hunny” pot that worked very well. And of course, Pooh Bear needed to hold the pot. Using the Spellbinders Pooh & Piglet die set, I cut the bear and the pot from colored cardstock and then inked the edges with Distress Oxide Inks to give some dimension.
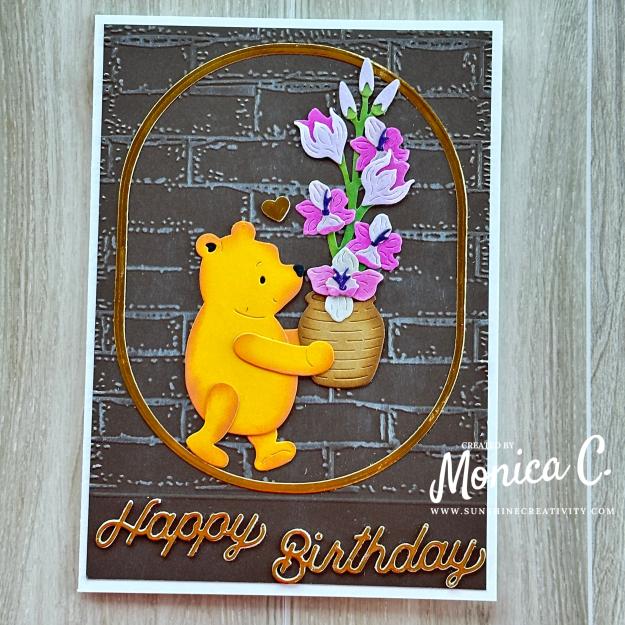
I did some partial embossing using an older Spellbinders embossing folder which I then inked over lightly with Picket Fence Distress Ink and added a gold oval, again using the Spellbinders Essential Stylish Oval die set. I added Pooh Bear with his gladiolus, that had been colored using dye inks and small blending brushes, to the inside of the oval and added a golden heart above him.
The card was completed with a “Happy Birthday” sentiment cut in gold and with three layers of white cardstock under the gold version to provide dimension. I love how this one turned out and shows how die sets can be combined to create unique and interesting scenes. Thank you for visiting with me again this week. I look forward to seeing you next week again to show you my next lot of creations.
Please note that the links below are affiliate links and I will earn a small commission if you choose to use my link, at no cost to you. I received the Layered Gladiolus, Essential Stylish Ovals and Classic Sentiments die sets from Spellbinders in order to create with. I purchased all the other products used in these projects myself.
| Project Specific Supplies |  Layered Gladiolus |
 Pooh & Piglet |
 Essential Ovals |
 Everyday Sentiments |
 Classic Sentiments |
|
| Coloring Mediums | ||
 Distress Oxide Inks |
 Copic Markers |
|
| Basic Tools & Supplies | ||
 Platinum 6 |
 Universal Plates |
 Ink Daubers |
 HBS Reverse Tweezers |
 Tool ‘n One |
 Scrappy Tape 1/8 |
 Bearly Art Glue |
||
In line with new European Data Protection Laws (GDPR) by commenting you know that your name and comment are visible to all who visit this blog and thereby consent to the use of your personal information for this specific purpose.
Many thanks for visiting and commenting on my blog!
Monica
Related Posts
4 Inspiring Ways to Use the New Hero Arts Vintage Vinyl Collection

Today marks a first for me – this is my first project creation blog post for Hero Arts. It has… Read More
Easy Shopping my Stash Finds a Hidden Treasure

Hello Friends! Today I have a card to share that I made by Shopping my Stash. A young man in… Read More
What can I say…. three lovely cards again. Well done!
The first two are similar and yet so different. The embossing works really well.
And the third card is just too sweet for words. Such a proud and happy Pooh Bear with his flower pot. Gorgeous.🙂🐾🐻