I have two cards to show you today that I made by combining the Spellbinders Peony Celebration die with the Spellbinders Anemone die. Both of these flowers were designed by Yana Smakula, and I love her flowers. She also did a Magnolia Blooms die and a Poinsettia Bloom die previously. I love those too and have created projects with them.
Spellbinders Peony Celebration die friendship
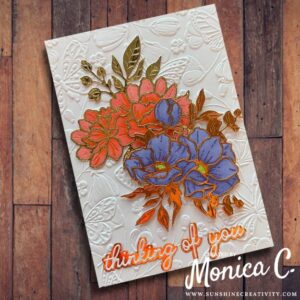
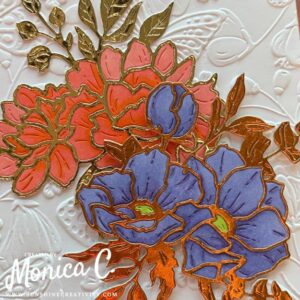
My first card is a friendship encouragement card with the Spellbinders Peony Celebration die serving as a backdrop to the Spellbinders Anemone die. Each of the dies comes with a detail layer and a shadow layer. I did not use the shadow layer for the flowers I am showing today. I cut the flowers out of both white and metallic cardstock.
Carefully removing the white cutout from the die in order to not let the center pieces fall out, I used my Copic markers to color the flower. With the little pieces still in the die, it was easy to color the various petals. Since I was adding the metallic outline on top, I did not have to be too careful in my coloring process to stay in the lines.
I used gold and copper metallic cardstock, using the gold for the peony and the copper for the anemone. Once I had completed the coloring, I carefully glued the metallic outline to the white base. Doing so really brought the flowers to life. Using the Spellbinders Handwritten Sentiments die set, I cut the words “thinking of you” out of white cardstock and the shadow for the words out of copper cardstock.
Using the Spellbinders Beautiful Butterflies 3D embossing folder on a full 5×7 card panel, I adhered it to a side-folding 5×7 card base. I glued the coral-colored peony spray directly onto the card panel. I then popped the lilac-colored anemones up with foam tape. Using 1/8-inch foam tape allowed me to cut little pieces to put behind the parts of the flowers. The card was completed with the die-cut sentiment, which was added to the bottom of the card.
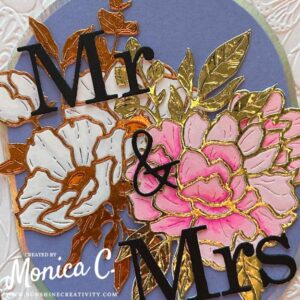
A wedding card with a layered oval
The second card became a wedding card. I colored the flowers for this card in white and pink and again used the copper and gold metallic cardstock for the outlines of the two different flowers. Using the Spellbinders Beautiful Butterflies 3D embossing folder to emboss the card panel, I created another 5×7 card. I used the Spellbinders Stylish Ovals die set to cut an oval from holographic cardstock and one from a periwinkle-colored cardstock. The two ovals were layered to form a landing place for the flowers.

On this card, I used the anemone as the back flower and the peony spray as the front one. Using an older Spellbinders die set, I cut the words “Mr” and “Mrs” and added them to the center of the card over the flowers. I heat embossed the word “congratulations” with white powder on black cardstock using the Spellbinders Just Wanted to Say stamp set.
I love Yana’s flowers. The intricacies of the designs allow one to go elegant with white and gold or add color. Using the shadow die on vellum is also a great way to separate the intricate flower from the rest of the card. I am curious to see what flower she designs next.
Please note that the product links used in this blog post are affiliate links and I will earn a small commission if you choose to use my link, at no cost to you. I purchased all these products myself.


 Just Wanted


In line with new European Data Protection Laws (GDPR) by commenting you know that your name and comment are visible to all who visit this blog and thereby consent to the use of your personal information for this specific purpose.
Many thanks for visiting and commenting on my blog!
Monica
2 lovely cards again, so intricate. Well done.
Also looked the other 2 again via the link, they were beautiful as well.