Today I am here to show you three cards that I made with a very new to me product. Spellbinders invited me to play with a letter from the new BetterPress Floral Alphabet called Every Occasion Floral Alphabet. I had a choice from a list of different letters and so, no prizes for guessing why, I chose the C. When the package came, however, Spellbinders had kindly included the letter W as well.
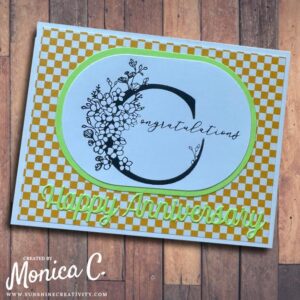
My first card is the monogram with the sentiment. I used Memento Tuxedo Black ink on the plate. I opted to not color this card this image, but rather to add the color for this anniversary card with the background and colored cardstock. I used a piece of gingham paper for the cardpanel and then cut the pressed image out with one of the Spellbinders Essential Ovals dies and then used one a size bigger to cut a light green matte. I completed the card by cutting the sentiment using the Spellbinders Happy Occasion Words die set (now retired).

My second card also features the C, but without the included sentiment. I added a bit of color to this pressed image with my Copic markers. Using the Spellbinders Just Wanted to Say Clear Stamp Set and Versafine Onyx Black ink, I stamped the sentiment under the C. This would also look nice as a foiled sentiment. I cut the focal image out with the largest die from the Spellbinders Spring Label Motifs (now retired) and the matte with the Spellbinders Notched Corner Frames die set. Doing some partial die cutting to make them longer, I created several long strips of laced borders using the Spellbinders Stylized Border Trio die set and then placing them on the plum colored cardpanel and cutting off the overhang. A long bladed scissors works really with for this purpose.
Using the W press plate
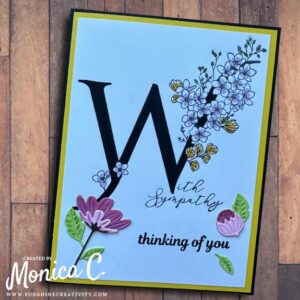
For my last card, I used the W plate with the sentiment. I cut the panel down to 4×5.25 inches and then added it onto a yellow matte before adhere it all to a black cardbase. Using the “thinking of you” stamp Spellbinders Butterfly Kisses Stamp & Die Bundle by Simon Hurley and Versafine Onyx Black ink, I stamped a sub-sentiment below the monogram. I completed the card by adding some die cut flowers created with the Spellbinders Be Bold Blooms die set. In order to make the W really black, I colored over it with a black Tombow marker.
I do not have the BetterPress system from Spellbinders, but I was very keen to try this in my Platinum 6 machine. I experimented with different sandwich options with the Universal Plate System until I found a sandwich that pressed the BetterPress plate into the paper, but did not squeeze the ink into blotches. I did find that dye ink worked much better than pigment ink and so I used Memento Tuxedo Black ink for all my examples moving forward. Once I had it figured out, I pressed one C with and one without the included sentiment. The sentiment is missing the first letter as the monogram is meant to be the first letter. Also the sentiment plate has some notches in it so that it sits perfectly in the provided space in the monogram to work together as a pair.
I believe that with the BetterPress System, the whole creation process would be much easier. But if you just wish to try it out, it is possible with some patience and careful experimentation to get an idea of the results. I have linked the BetterPress System for you below in case you wish to check it out. Keep in mind that BetterPress plates can also be used for Hot Foiling, if you have that system.
Please note that the links below are affiliate links and I will earn a small commission if you choose to use my link, at no cost to you. I received the Floral C and Sentiment Press Plate, Floral W and Sentiment Press Plate, the Essential Ovals die set, Butterfly Kisses Stamp & Die Bundle by Simon Hurley and the Spellbinders Notched Corner Frames die set from Spellbinders in order to create with. I purchased all the other products used in these projects myself.


 Stylized Border
 Just Wanted

 Be Bold


In line with new European Data Protection Laws (GDPR) by commenting you know that your name and comment are visible to all who visit this blog and thereby consent to the use of your personal information for this specific purpose.
Many thanks for visiting and commenting on my blog!
Monica
This is now a new technique and idea again, very effective and beautiful. I especially like the 2nd and 3rd card. Lovely ideas and colours. Again, well done. 🙂