Today I am here with four cards to show you that I created with the Spellbinders Floral Garden stamp from the new Beautiful Backgrounds collection with Stampendous. When Spellbinders contacted me to ask if I would like to work with one of the stamps from the collection, I was thrilled. I immediately chose the Floral Garden stamp. I had previously done a floral background in a coloring book, but this was the first time I had done it using a physical stamp.
A background stamp colored in pencils
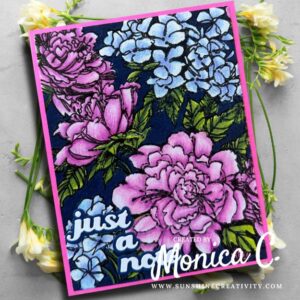
For my first card, I stamped the image onto Canson C’ a Grain paper with Memento ink. I left the stamp in my stamping platform as I planned to restamp the image after I had colored it. I colored the whole background with my Prismacolor colored pencils. Pencil coloring is extremely relaxing and this took me a few days to complete. I colored the background with a dark blue pencil.
Once I had done all the coloring, I put the paper back into my stamping platform and restamped the image, this time in Versafine Onyx Black ink. Because I had not taken the stamp out of the platfrom, it was still in the same place and so a restamping was easy. While the Versafine ink was still wet, I added clear embossing powder and heat set it. This resulted in the return of the black outlines, but with some shine. I cut the panel down to 4×5.25 inches and adhered it to a bright pink cardpanel which I in turn adhered to a top-folding A2 sized notecard. I completed the card with a “just a note” sentiment using the Spellbinders Popular Sentiment die set.
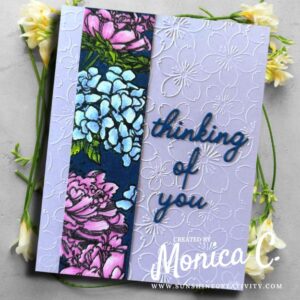
Since the stamp is square, I had a narrow strip left after cutting down my cardpanel. After the effort I put into the coloring, I was not going to toss it. So I dry embossed a cardpanel with an embossing folder from my stash and added the strip from the colored background to the left side of the card. I added a “thinking of you” sentiment using the Spellbinders Handwritten Sentiments die set. I used only the words, without the shadows.
Spellbinders Floral Garden colored in alcohol markers
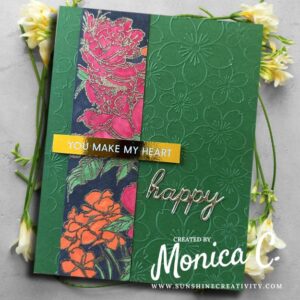
My third card is another complete background done with the Spellbinder Floral Garden stamp. I stamped the image onto white cardstock with Memento ink and colored the whole background with my Copic markers. Memento ink is a dye ink and so can be used for alcohol marker coloring. I kept the coloring very simple, not adding any shading as I wanted it to be a backdrop for the outline. As before, I put the paper back into the stamping platform that still had the stamp in place and restamped it over the coloring. I stamped with Versafine Onyx Black ink and covered it with gold embossing powder. The rich shine that it gives is so pretty. I cut the panel down to 4×5.25 inches before adding it to a dark green card panel. The panel was then adhered to a top-folding white notecard. Again using the Spellbinder Popular Sentiments die set, I added a sentiment that reads “best wishes”. It is cut in white with a gold shadow.

My final card is made with the strip I cut off the colored background. Again, like before with the strip I cut off, I added it to an embossed cardpanel. I used a pre-printed sentiment that I foiled with my Minc Machine and added a die cut sentiment from the Spellbinders Handwritten Sentiments die set.
This background stamp is so much fun to use. I plan to stamp out a few more and have them on hand to color as I have time and inclination.
Please note that the links below are affiliate links and I will earn a small commission if you choose to use my link, at no cost to you. I received the Floral Garden stamp from Spellbinders in order to create with. I purchased all the other products used in these projects myself.
| Project Specific Supplies | ||
 Floral Garden |
 Handwritten Sentiments |
 Popular Sentiments |
| Paper and Coloring | ||
 Canson C’ a Grain |
 Prismacolor Pencils |
 Copic Markers |
| Special Effects | ||
 Tuxedo Black |
 VersaFine Onyx |
 Princess Gold |
 Gold Foil |
 Minc Machine |
|
| Basic Supplies | ||
 Platinum 6 |
 Universal Plates |
 Tool ‘n One |
 Reverse Tweezers |
 Scrappy Tape 1/8 |
 Bearly Art Glue |
In line with new European Data Protection Laws (GDPR) by commenting you know that your name and comment are visible to all who visit this blog and thereby consent to the use of your personal information for this specific purpose.
Many thanks for visiting and commenting on my blog!
Monica
Such exquisite cards. I love the way you used the strip that you cut off to create another two cards.